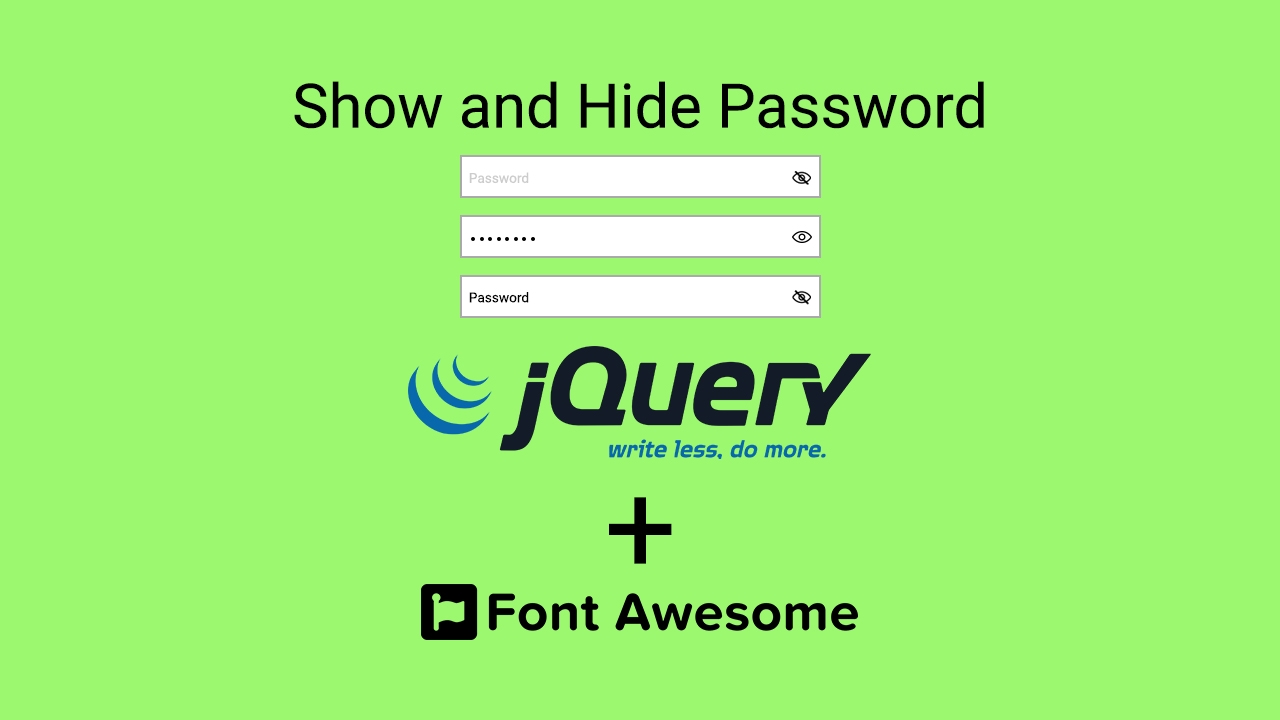
In this article, I will explain and provide the code for how to create a show and hide password input field, as you can see in the next figure there are three cases for our password input field.
- The first one: is hidden and shows a placeholder
- We fill in the password next
- Then we click the eye icon
And clicking back the icon again will return to case 2.

The mechanism of this functionality is controlled using JavaScript via jQuery library for ease of use, by clicking on the eye icon; the eye icon will change to a slashed eye and the type of the input field is converted to “text” and click the icon again will reverse the operation and convert the icon to the non-slashed eye and a “password” type input field is returned.
To create this password input we will import in the head of the HTML file the Font Awesome library from a CDN like this:
<link rel="stylesheet" href="https://cdnjs.cloudflare.com/ajax/libs/font-awesome/6.2.1/css/all.min.css">The HTML code of this password input is like this:
<main>
            <div class="input-container">
                  <input type="password" class="password-field" placeholder="Password" autocomplete="off">
                  <i class="fa-regular fa-eye icon2"></i>
                  <i class="fa-regular fa-eye-slash icon3"></i>
            </div>
      </main>
The CSS of styling this HTML to the desired need we want is like this (and I wrote it in the head after the Font Awesome library importation):
<style>
            *{
                  box-sizing: border-box;
            }
            .input-container{
                  position: relative;
                  width: 300px;
                  height: 50px;
            }
            .password-field {
                  position: relative;
                  background-color: white;
                  color: black;
                  border: 1px solid #cccccc;
                  padding: 10px 10px;
                  width: 300px;
                  height: 50px;
                  outline: none;
            }
            .icon2 {
                  font-size: 15px;
                  color: black;
                  position: absolute;
                  top: 20px;
                  right: 11px;
                  cursor: pointer;
            }
            .icon3 {
                  font-size: 15px;
                  color: black;
                  position: absolute;
                  top: 20px;
                  right: 10px;
                  cursor: pointer;
                  display: none;
            }
      </style>
Please notice that I have made the slashed eye icon hidden at the beginning of loading the page using CSS, then we control the functionality using jQuery like this:
First, we import the jQuery library before the ending tag of the body element, and we write the interaction code below it in another script element.
<script src="https://cdnjs.cloudflare.com/ajax/libs/jquery/3.6.1/jquery.min.js"></script>
      <script>
            $(".input-container .icon2").click(function(){
                  $(this).css("display","none");
                  $(this).parent().find(".icon3").css("display","block");
                  $(this).parent().find(".password-field").attr("type","text");
            });
            $(".input-container .icon3").click(function(){
                  $(this).css("display","none");
                  $(this).parent().find(".icon2").css("display","block");
                  $(this).parent().find(".password-field").attr("type","password");
            });
      </script>
The code is straightforward, the beauty of jQuery code is it is readable and meaningful, this is not a tutorial explaining the jQuery library, but what we do is just as I described above, we switch the eye icon with the input type field each time we click the icon.
That is, you created a show and hide password input field using jQuery and Font Awesome libraries.
posted by Emad Zedan on 23 Dec 2022 in UX/UI Design, Web Design, WordPress